
 |
| Photo credit: John Trainor, uploaded via Flickr, Creative Commons License |
16.1 Managing Files:
Here we get a quick demonstration on using the Files panel to do some file and folder manipulation. We note that there is a right-click context menu available in the files panel, allowing for quick access to tasks such as New File/Folder, Cut/Copy/Paste, Rename, etc. We also note that we can drag and drop files and folders within the panel.
Furthermore, we see how Dreamweaver keeps track of what we do with files when we manage them from the Files panel. For instance, before allowing us to move a file, Dreamweaver alerts us if the move will sever links, or otherwise disrupt our site, and give us the opportunity to have the application update the path information for us.
As mentioned in an earlier lesson, Dreamweaver is only aware of these file manipulations when they are performed from within the application itself. If one creates folders and shuffles files about from within the OS file-system interface, Dreamweaver will lose track of those file locations.
16.2 Entering Web Server Information:
So, suppose we have thoroughly tested our site operation, and now feel that it’s ready for prime-time. How do we get our site files onto a web server?
Well, we could copy all of our files onto removable media, put on some comfortable shoes, and use sneaker-net transfer protocol to shuffle those files down to the local web-hosting company’s server farm. Then again, wouldn’t it be better if we could just move all of those files directly onto the web server right from our desktop? Yeah….but suppose your old FTP client was archived on some old 5-1/4” floppy disc buried in your attic, and you can’t remember the command-line syntax to initiate a transfer with Y Modem-G *or* Kermit. Whaddya’ gonna do? Well, it just so happens that Dreamweaver has an FTP client baked-right-in for just such an occasion.
We discussed the site management back in Assignment 5. Choosing Site=>Manage Sites… from the menu bar brings us to the Manage Sites dialogue. From there, we select our site from the list and choose the Edit option to bring up the Site Setup dialogue box. We will select Servers in the left pane of the dialogue box, and then click on the Add Server icon in the right pane. This will bring you to the dialogue box below:

Here you will give your server a name to identify it in Dreamweaver (anything you want to call it), the IP address of the server (it looks like IPV6 is also supported), and your access credentials. There is a Test button as well, so you can verify the connection before you close the dialogue.
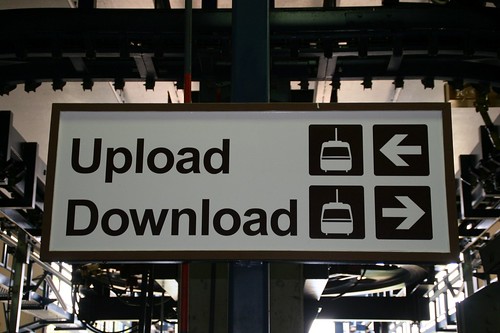
Assuming that the server setup was successful, we can now return to our files panel. Here we will select the files we need to send to the web server and click the Upload icon (up arrow) at the top of the files panel. Just like that, off goes our site onto the inter-webs.
Of course, the web server that we just uploaded our site to is likely running a different hardware/software/OS combo than the cheesy eMachines laptop that we developed and tested our site on, so it advised that we visit the live site and recheck that everything is functioning properly.
16.3 Expanding the Files Panel
Note that in the Files panel toolbar, there is an icon to Expand to show local and remote sites. This is useful once we have established a web server and uploaded files thereto. The Expand… icon maximizes the files panel on our screen, and offers a split-pane file system view, showing the files stored on the remote server in one pane, and local files on the other.
To schlep files back and forth between machines, one can select the files to be copied, and then click either the Upload or Download icon, as appropriate (sorry, no drag-and-drop in this environment).
16.4 InContext Editing:
A bit of a sales-pitch here for some ancillary Adobe services that allows basic content editing through a web portal. It’s worthwhile knowing that the option exists, I suppose. Google Adobe InContext Editing if interested.
16.5 Subversion Control:
Here is another pitch for some Adobe services, although our tutor claims that this one is free (the first one is *always* free, ‘til they get their hooks in you). Anyway, the Subversion system is a level-based archive system that lets you store and retrieve prior versions of your website files. You can set-up the system through the Site Setup dialogue by clicking on the Version Control option.
This was a pretty damn cool post. Waiting for more.
ReplyDelete